
How to Add a New Circuit: Load, Permits and Inspections
The range is already electric, the dryer runs every evening, and the new Level 2 charger is sitting in the garage. An empty slot in the panel looks like the answer. It is not. Learning how to add a new circuit starts with whether the service can carry the extra load, then moves through wire size, a permit, and the inspections that close the job.
Table of Contents
Check Whether Your Panel Can Carry the Load
A free breaker space can mislead. It shows the panel has room for a handle, while the service behind that handle may already be close to its limit on a normal evening. Jefferson County's electrical wiring guide says service equipment must be large enough for the connected load, and it treats both adding to existing circuits and creating new circuits as permitted work. Electrification is steadily adding demand to the same service through larger cooking, heating, cooling, and charging loads.
Use these sizes as a starting map, then confirm every one against the appliance nameplate.
Circuit | Voltage | Typical breaker | Notes |
|---|---|---|---|
General lighting | 120 V | 15 A | Often shared with a few ceiling fixtures |
Kitchen small appliances | 120 V | 20 A | Dwelling kitchens need at least two 20 A small-appliance circuits |
Bathroom receptacle | 120 V | 20 A | GFCI protection required |
Clothes dryer | 240 V | 30 A | Electric dryer; confirm on the nameplate |
Electric range | 240 V | 40 A or 50 A | Check the nameplate and cord rating |
Level 2 EV charger (48 A output) | 240 V | 60 A | Breaker sized above the charger's continuous output |
Heat pump or central air | 240 V | Nameplate maximum overcurrent | Use the unit's minimum circuit ampacity and maximum breaker on the nameplate |
What you can check before anyone opens the panel
Read the service rating on the main breaker label and treat that number as the ceiling. List the large loads already installed: range, dryer, water heater, and HVAC. Then mark whether the new load runs for three hours or more. That continuous use is why a charger is harder on a service than a tool you run for twenty minutes.
Say the house is on a 100 A service with an electric range and an electric dryer, and you want a Level 2 charger. Those loads can overlap at dinner. The math can sit at or past the service rating even with open breaker spaces. A licensed electrician should run a dwelling load calculation before any cable is bought. Our load calculation for a home walks through how simultaneous loads change the result.
If the number is too high, the useful options are load management that caps the charger's draw, a service upgrade, a subpanel only when the calculation still passes, or a smaller appliance. I would pause and get the calculation before buying wire whenever the expected peak sits close to the service rating.
Plan the Circuit From the Load Backward
Start at the appliance and work back to the panel. A breaker chosen first, then forced onto the wrong cable, is the design error that fails jobs.
Read the nameplate for voltage, running amps, and minimum circuit ampacity. Note whether the load is continuous, meaning it can run three hours or longer. A charger and many heaters are continuous. A garage door opener is not.
For a continuous load, size the circuit at 125 percent of the rated current. A charger with a 48 A output needs a 60 A circuit, not a 50 A breaker “because it is close.”
Match the breaker to the copper conductor, and check the cable's temperature rating against the breaker terminal limit. Typical pairings are 14 AWG for 15 A, 12 AWG for 20 A, 10 AWG for 30 A, 8 AWG for 40 A, and 6 AWG for 50 A to 60 A.
Breaker | Minimum copper conductor |
|---|---|
15 A | 14 AWG |
20 A | 12 AWG |
40 A | 8 AWG |
50 A to 60 A | 6 AWG |
Pick the cable for the place it will live. NM-B belongs in dry interior walls. Damp, outdoor, or exposed runs usually need conduit and wet-rated conductors. The wrong jacket is a tear-out, not a sticker fix.
Measure the run. A long path to a detached garage can need the next larger conductor so voltage drop stays inside accepted limits. Guessing “it will be fine” shows up as a charger that throttles or a motor that runs hot.
Count every conductor, device, and clamp for box fill. A crowded box overheats the insulation even when the breaker is correct.
Match the receptacle rating to the breaker. In many dwelling areas, new 120-volt, 15- and 20-amp outlets also need listed AFCI protection, and wet or kitchen locations add GFCI. Local adoption of the model code can differ, so confirm both before you buy devices.
Write one sheet: load, breaker, wire size, route, panel location, and protection. That sheet is what you hand the permit office and what the inspector expects to see in the wall.
Practical rule: If the breaker ampacity is higher than the conductor's ampacity, the wire can overheat before the breaker opens.
Permits and the Three Inspections That Close the Job
The permit is where service capacity stops being a guess. An empty breaker slot proves there is physical room for a handle; it does not prove the service, feeders, or panel can carry the new load. Before filing, write down the load, breaker size, wire size, route, panel location, and required protection. That sheet gives the permit office enough to review and gives the inspector the same facts the wall will show.
The sequence below is the one Seattle uses for a new circuit, from filing through the sign-off that closes the permit.
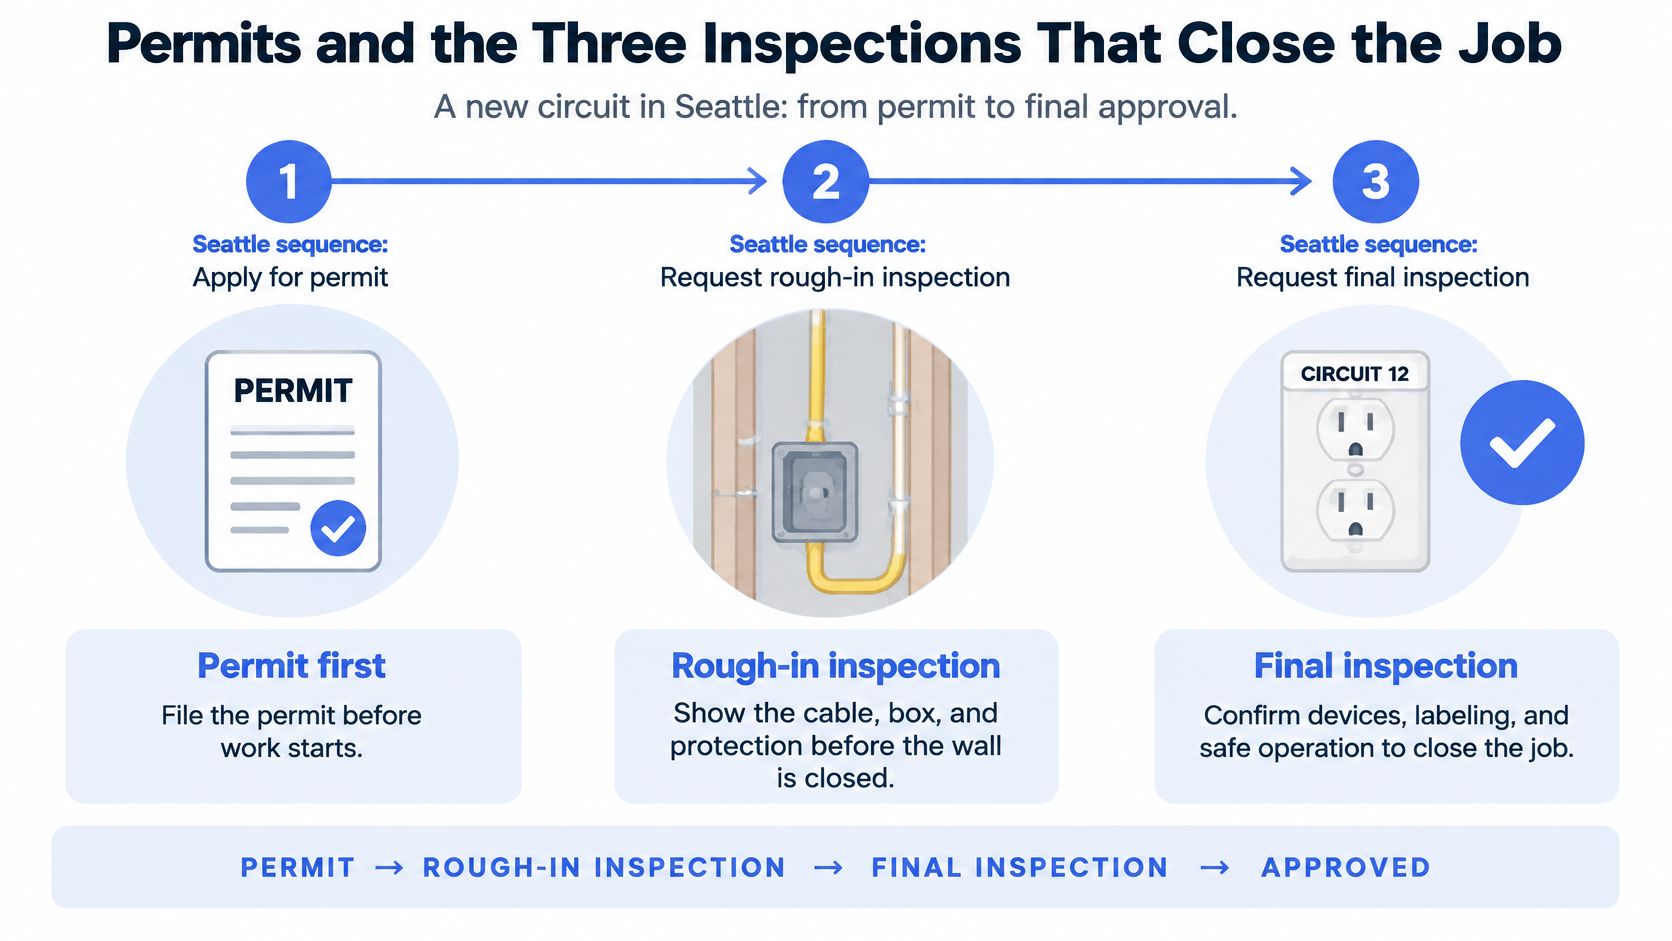
Seattle's electrical-inspection guidance names three common checkpoints: a cover inspection, a service-and-feeder inspection, and a final inspection.
Inspection | When it happens | What it verifies |
|---|---|---|
Cover (rough-in) | After boxes, conductors and grounds are installed, before insulation, devices or drywall | Boxes, conductors, grounding connections and nail plates |
Service | When the panel, meter base or subpanel is changed | Service mast, meter base, panel, grounding-electrode conductors and branch circuits where possible |
Final | After the panel is covered, circuits are labeled, cover plates are on and equipment is energized | Panel cover, labeling, cover plates and grounding |
A branch circuit leaves its proof inside the wall. The cover inspection is the last chance for the inspector to see how the cable is run, grounded and protected before finish work hides it. The service inspection enters when the work touches the equipment that feeds the house, such as the mast, meter base, main panel or a subpanel. At final, the inspector is checking what remains visible: a covered and labeled panel, finished devices and grounded equipment that can be energized safely.
Portland's residential process uses a similar rough-in, a service inspection when a panel or subpanel changes, and a final to close the permit. A permit can expire if too much time passes between inspections, so a paused remodel may need a new filing before work resumes.
Why the wall has to stay open
Say you wire a new kitchen circuit on a Saturday and hang drywall Sunday so the cabinets can land Monday. The inspector arrives and cannot see the cable, the grounds, or the nail plates. You open the wall. The practical order is load and panel evaluation, permit approval, rough-in, cover inspection, final connection, labeling, then final inspection. A home electrical safety inspection follows the same habit on the homeowner side: look before the work disappears.
The local authority having jurisdiction sets the exact path. Call the permit office and ask which inspections apply to a branch circuit versus a panel change, whether a load calculation is required with the application, and how to book each visit. Keep the permit number, each inspection date and every sign-off. That record is what a later buyer, insurer or electrician will ask for when the circuit becomes part of the house's history.
This short walk-through shows the same permit-to-final rhythm on a real panel.
Run, Terminate and Protect the Circuit Without Failing Inspection
Each step below is what the installer does, and what you should be able to point at before the inspector walks in.
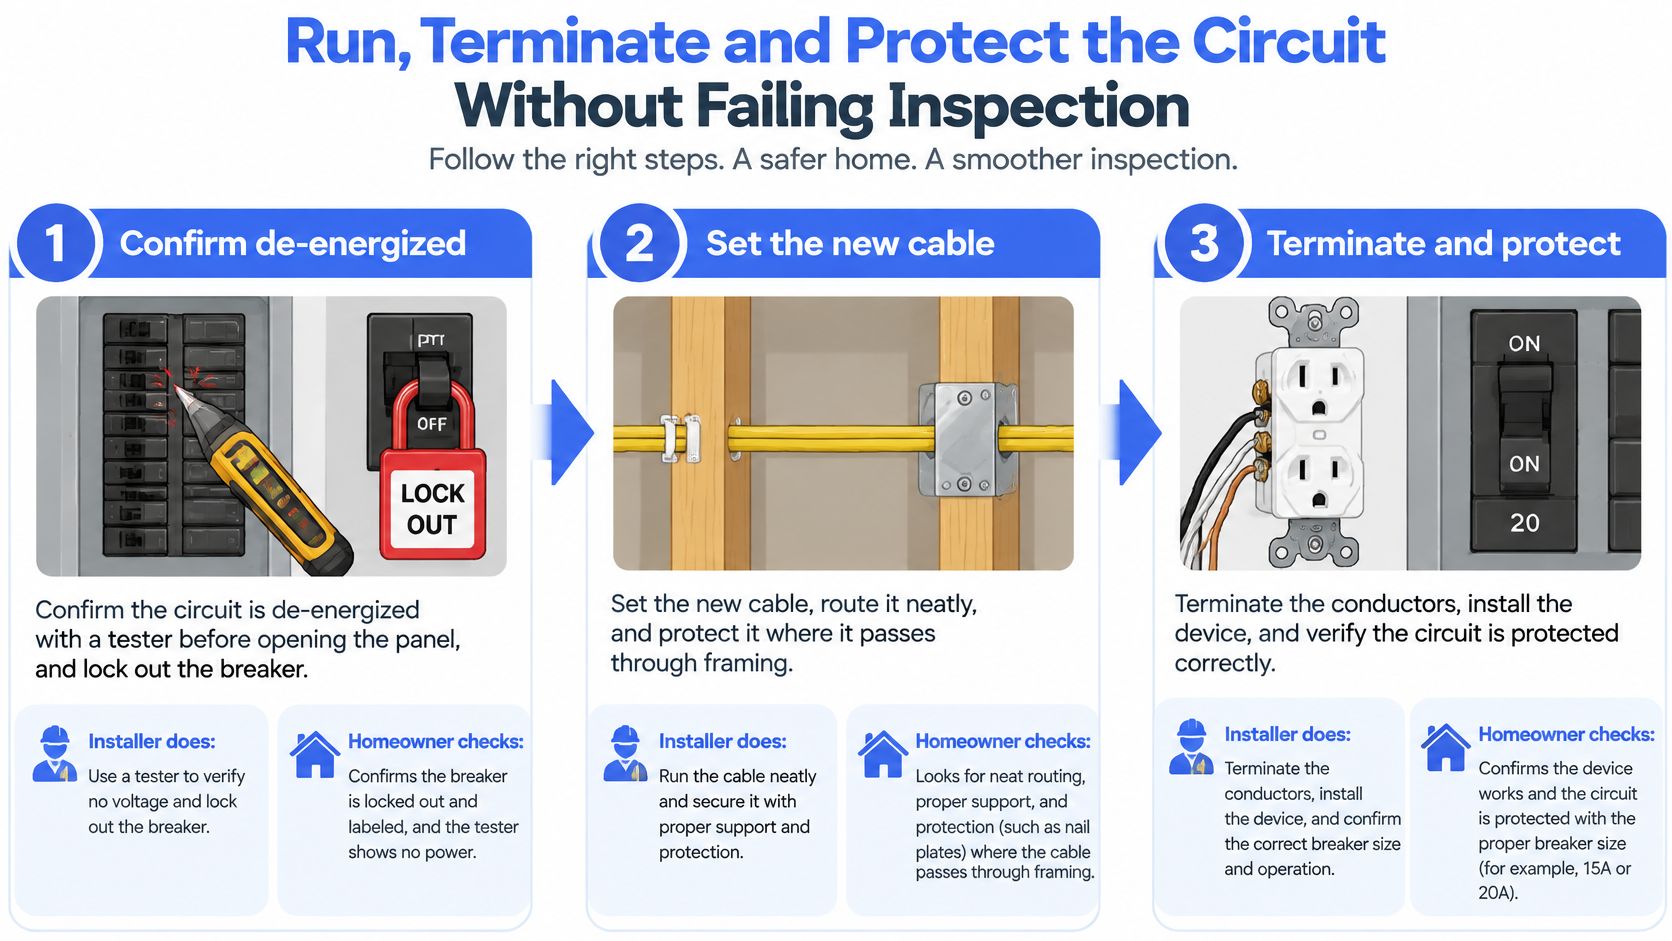
Confirm the circuit is de-energized with a tester before the cover comes off, and lock out the breaker. A dark room is not a test. The meter is.
Set the box and mount the device at the planned height. Leave enough free conductor to make the terminations twice. A cable cut flush with the box cannot be landed cleanly.
Support the cable through the framing and protect it. Fit a nail plate wherever the cable sits within 1 1/4 inch of the stud face. That plate is what stops a finish nail from finding the hot.
Bond equipment grounds to the box and the panel ground bar. Neutrals stay on the neutral bar. Downstream of the service disconnect, neutrals and equipment grounds stay isolated from each other.
Land the hot on the breaker and the neutral on the neutral bar. Torque every terminal to the manufacturer's specification with a torque screwdriver, not “tight enough.”
Install listed AFCI or GFCI protection where the location requires it, and test it. Under the 2023 NEC changes summarized by The Home Depot's code-change guide, kitchen receptacles generally need GFCI regardless of distance from the sink. Ranges, wall ovens, counter cooking units, clothes dryers, and microwaves may need GFCI on the branch circuit or the outlet. Use the device test button and a receptacle tester. A ground fault versus a short circuit is a different failure, and the protective device has to match the one you are trying to clear.
Write the circuit in the panel directory and label the outlet. “Spare” and “kitchen” on the same row is how the wrong breaker gets turned off during a repair.
The mistakes inspectors actually write up
Mistake | Why it fails | Fix |
|---|---|---|
Adding to a circuit already near its limit | Overloads the conductor and breaker | Run a dedicated circuit sized for the appliance |
Oversized breaker on small wire | Wire can overheat before the breaker trips | Match the breaker to the conductor, 14 AWG on 15 A and 12 AWG on 20 A |
Shared neutral without proper arrangement | Creates shock and overload risk | Keep neutrals separated per circuit unless a specific multiwire design is approved |
Overfilled box | Crowded conductors overheat and damage insulation | Calculate box fill and install a larger box |
Missing AFCI or GFCI where required | Fails protection requirements | Install listed devices and test them with the test button |
Work covered before cover inspection | Inspector cannot verify connections | Schedule rough-in before insulation and drywall |
Unlabeled breaker | Slows isolation during an emergency or repair | Update the panel directory and label the outlet |
Before the inspector arrives, count the devices on the new breaker, compare the breaker rating with the size printed on the cable jacket, look inside each box for crowding, and press every test button. Protection that you cannot reach later is a fail on its own.
A finished circuit is a breaker in the panel, a legible directory line, a working test button, and no exposed cable.
The final record should list breaker rating, conductor size, circuit destination, test results, and the permit or inspection number. That packet is what closes the job.
Decide Whether to Hire an Electrician for the Job
An open breaker slot only proves there is physical space in the panel. It does not tell you the service can carry the new load, and that gap is where hiring decisions get made. I would bring in a licensed electrician whenever any of three checks fails: the service capacity is uncertain, a permit and inspections apply, or the cable will run behind finished walls.
The stakes are concrete. NFPA home electrical fire figures associate electrical distribution, lighting, or power-transfer equipment with an estimated annual average of 46,652 U.S. home structure fires during 2020–2024, and about 527 civilian deaths a year. A new circuit has to match its load and carry the right protection from the first termination.
A panel upgrade is worth pricing when breakers trip often, lights flicker, new appliances are going in, or the house still has a 100 A panel. Ask any contractor four things: will they perform a load calculation, will they pull the permit and book each inspection, who holds the license, and what the written scope covers. Our electricians are licensed, and On Time Home Services is one option to set beside other written quotes. Comparing scopes is the point.
Some home-service sites exist to capture a phone number rather than a scope of work. A plain look at 2026 lead generation for plumbers shows how those funnels are built, which makes a line-item quote easier to tell apart from a generic callback form.
Write down the appliance, its nameplate amps, and the panel's service rating, then ask at least two electricians for a written scope that includes the permit.
On Time Home Services handles panel and service upgrades, GFCI protection, and subpanels when a new load will not fit the service you have. If you are adding a charger, a range, or a workshop circuit and want the load checked before any cable is pulled, start with a written scope. Visit On Time Home Services to request that review.
Comments